 Hyundai Sonata: Rear Lower Arm. Repair procedures
Removal
| 1. |
Remove the rear wheel & tire.
|
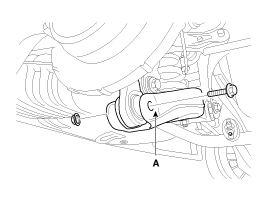
| 2. |
Set up the transmission jack (A) under the lower arm (B).
|

| 3. |
Loosen the nut and then remove the rear stabilizer link(B) with
the rear lower arm(A).
|

| 4. |
Loosen the bolt & nut and then remove the rear lower arm (A) with
the rear axle.
|
| 5. |
Loosen the bolt & nut and then remove the rear lower arm (A) from
the sub frame.
|

Installation
| 1. |
Installation is the reverse of removal.
|
Inspection
| 1. |
Check the bushing for wear and deterioration.
|
| 2. |
Check the rear lower arm for deformation.
|
| 3. |
Check for all bolts and nut.
|
| 4. |
Check the cracks or the cutting of the lower arm.
|
 Rear Upper Arm. Repair procedures
Removal
1.
Remove the rear wheel & tire.
Tightening torque:
88.3 ~ 107.9 N.m (9.0 ~ 11.0 kgf.m, 65.1 ~ 79.6 lb-ft)
...
 Rear Stabilizer Bar. Repair procedures
Replacement
1.
Remove the rear wheel & tire.
Tightening torque:
88.3 ~ 107.9 N.m (9.0 ~ 11.0 kgf.m, 65.1 ~ 79.6 lb-ft)
...
See also:
Care of seat belts
Seat belt systems should never be disassembled or modified. In addition, care
should be taken to assure that seat belts and belt hardware are not damaged by seat
hinges, doors or other abuse.
WAR ...
Remote keyless entry system operations
Lock (1)
All doors are locked if the lock button is pressed. If all doors, trunk and hood
are closed, the hazard warning lights will blink once to indicate that all doors
are locked.
Also, i ...
High Pressure Fuel Pump. Repair procedures
Removal
In case of removing the high pressure fuel pump, high pressure
fuel pipe, delivery pipe, and injector, there may be in ...
