 Hyundai Sonata: Water pump. Repair procedures
Removal and Installation
| 1. |
Loosen the drain plug, and then drain the engine
coolant. Remove the radiator cap to drain with speed.
|
| 2. |
Remove the drive belt (A) after turning the drive
belt tensioner (B) counterclockwise.
|
| 3. |
Remove the water pump pulley (A).
|
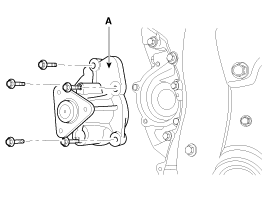
| 4. |
Remove the water pump (A) with the gasket.
|
| 5. |
ULEV : Remove the exhaust manifold heat protector
(A).
SULEV : Using the SST (09392-2H100) (A), remove the
front oxygen sensor (B) and the remove the exhaust manifold heat protector
(C).
|
| 6. |
Remove the water pump housing (A) with the gasket
and the water inlet pipe (B).
|
| 7. |
Installation is reverse order of removal with a new
water pump gasket.
|
| 8. |
Fill the engine coolant.
|
| 9. |
Start the engine and check for leaks.
|
| 10. |
Recheck the coolant level.
|
Inspection
| 1. |
Check each part for cracks, damage or wear, and replace
the coolant pump assembly if necessary.
|
| 2. |
Check the bearing for damage, abnormal noise and
sluggish rotation, and replace the coolant pump assembly if necessary.
|
| 3. |
Check for coolant leakage. If coolant leaks from
hole, the seal is defective. Replace the coolant pump assembly.
|
 Water pump. Components and Components Location
Components
1. Water pump pulley
2. Water pump
3. Water pump gasket
4. Water pump housing
5. Water pump housing gasket
6. O-ring
7. Water inlet pipe
8. ...
 Water pump. Troubleshooting
Troubleshooting
Water Pump
Symptoms
Possible Causes
Remedy
Coolant leakage
•
From the bleed hole ...
See also:
Solenoid valve. Specifications
Specification
Item
Function
Piece
Specification
VFS
26/B
T/Con
2
Control p ...
Radiator. Components and Components Location
Components
1. Cooling fan assembly
2. Radiator
3. Mounting insulator
4. Radiator mounting bracket
5. Radiator upper hose
6. Radiator lower hose
7. Reservo ...
Seat Heater. Components and Components Location
Component Location
...


