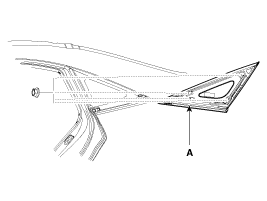
Removal
| •
|
Put on gloves to protect your hands.
|
| •
|
Take care not to body surface and other parts.
|
|
|
1. |
Remove the following parts
| A. |
Rear seat assembly
(Refer to the BD group - "Rear Seat")
|
| B. |
Rear pillar trim
(Refer to the BD group - "Interior Trim")
|
|
|
2. |
Loosen the quarter fixed glass (A) mounting nut.
Tightening torque :
3.9 ~ 4.4 N.m (0.4 ~ 0.45 kgf.m, 2.9 ~ 3.3 lb-ft)
|

|
|
3. |
Cut out the sealant using the sealant cutting tool [09861-31100].
|
• |
Do not scrape down to the painted surface of the
body; damaged paint will interfere with proper bonding.
|
|
• |
Remove the rubber dam and fastereners from the
body.
|
|
• |
Mask off surrounding surfaces before painting.
|
|
|
|
4. |
Remove the quarter fixed glass.
|
Installation
|
1. |
With a putt knife, scrape the old adhesive smooth to a thickness
of about 2mm (0.08 in.) on the bonding surface around the entire quarter
fixed glass flange.
| A. |
Do not scrape down to the painted surface of the body;
damaged paint will interfere with proper bonding.
|
| B. |
Mask off surrounding surfaces before painting.
|
| C. |
Remove the fasteners from the body.
|
|
|
2. |
Clean the body bonding surface with a sponge dampened in alcohol.
After cleaning, keep oil, grease and water from getting on the surface.
|
|
3. |
With a sponge, apply a light coat of glass primer along the edge
of the quarter fixed glass as shown, then lightly wipe it off with gauze
or cheese cloth :
| A. |
Do not apply body primer to the quarter fixed glass, and
do not get body and glass primer sponges mixed up.
|
| B. |
Never touch the primed surfaces with your hands. If you
do, the adhesive may not bond to the quarter fixed glass properly,
causing a leak after the quarter fixed glass in installed.
|
| C. |
Keep water, dust, and abrasive materials away from the
primed surface.
|
|
|
4. |
With a sponge, apply a light coat of body primer to the original
adhesive remaining around the flange. Let the body primer dry for at
least 10 minutes.
| A. |
Do not apply glass primer to the body, and be careful
not to mix up glass and body primer sponges.
|
| B. |
Never touch the primed surfaces with your hands.
|
|
|
5. |
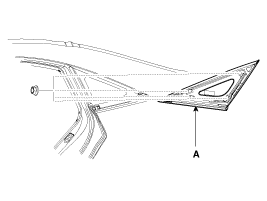
Pack adhesive into the cartridge without air pockets to ensure
continuous delivery. Put the cartridge in a caulking gun, and run a
bead of sealant around the edge of the quarter fixed glass (A) as shown.
Apply the adhesive within 30 minutes after applying the glass primer.
Make a slightly thicker bead at each corner.
Tightening torque :
3.9 ~ 4.4 N.m (0.4 ~ 0.45 kgf.m, 2.9 ~ 3.3 lb-ft)
|

|
|
6. |
Install the quarter fixed glass.
|
|
7. |
Let the adhesive dry for at least one hour, then spray water over
the roof and check for leaks. If a leak occurs, let it dry, then seal
with sealant :
| A. |
Let the vehicle stand for at least four hours after windshield
installation. If the vehicle must be driven within 4 hours,
it must be driven slowly.
|
|
|
8. |
Reinstall all remaining removed parts.
|
|
9. |
Installation the following items.
| A. |
Rear seat assembly
(Refer to the BD - "Rear Seat")
|
| B. |
Rear pillar trim (Refer to the BD - "Interior Trim")
|
|
Replacement
Removal
•
Put on gloves to protect your hands.
•
...
Removal
•
Put on gloves to protect your hands.
•
...
See also:
Rear Seat. Components and Components Location
Components
1. Rear seat back
2. Rear seat cushion
3. Armrest
...
To set cruise control speed
1. Push the cruise ON-OFF button on the steering wheel to turn the system on.
The CRUISE indicator light in the instrument cluster will illuminate.
2. Accelerate to the desired speed, which mus ...
Exterior care
Exterior general caution
It is very important to follow the label directions when using any chemical cleaner
or polish. Read all warning and caution statements that appear on the label.
Finish mai ...
 Hyundai Sonata: Quarter Fixed Glass. Repair procedures
 Windshield Glass. Repair procedures
 Rear Window Glass. Repair procedures

